Index.
- Introduction.
- Configure the NFS server.
- Configure the dhcpd and inetd service.
- Configure the dnsmasq service.
- Syslinux setup.
- Syslinux menus.
- Slackware Linux installers.
- Download.
10-Jul-2011: initial release.
07-Feb-2012: removed TCP wrapper reference.
04-Aug-2012: upgraded to Arch 2012 installer.
31-Dec-2012: adjusted for Slackware.
Introduction.
Our Home Server already has most tools available to add a PXE server. With a PXE server you can boot computers over the network and load software on them. This can be used for rescue software, installer CD’s etc. The components needed to build a PXE server are:
- dhcp – A DHCP server, client, and relay agent.
- nfsutils – Support programs for Network File Systems
- syslinux – Collection of boot loaders that boot from FAT, ext2/3/4 and btrfs filesystems, from CDs and via PXE.
- tftp-hpa – Official tftp server.
- dnsmasq – Intergrated dhcp, dns and tftp server (instead of 1 and 4).
There are two ways to do this. First I will show the ISC dhcpd plus tftp-hpa solution. The second solution is based on dnsmasq. Both solutions can benefit from the availibility of a nfs server, so set that up first.
Configure the NFS server.
While it is not strictly necessary, but some PXE images load faster when you use NFS instead of only tftp. One of these images is the System Rescue CD. Add the following line to /etc/exports:
/tftpboot 10.126.160.0/24(ro,no_subtree_check,all_squash)
Configure the dhcpd and inetd service.
Add the following lines to /etc/dhcpd.conf:
# bootserver support
filename "pxelinux.0";
next-server 10.126.160.253;
Edit the file /etc/inetd.conf to enable tftp:
tftp dgram udp wait root /usr/sbin/in.tftpd in.tftpd -s /tftpboot -r blksize
After this, restart the dhcpd and inetd daemons.
Configure the dnsmasq service.
If you use dnsmasq as dhcp and dns server, you can use this as PXE server too. Enable and configure the following lines in /etc/dnsmasq.conf:
# Set the boot filename for netboot/PXE. You will only need
# this is you want to boot machines over the network and you will need
# a TFTP server; either dnsmasq's built in TFTP server or an
# external one. (See below for how to enable the TFTP server.)
dhcp-boot=pxelinux.0
# Enable dnsmasq's built-in TFTP server
enable-tftp
# Set the root directory for files available via FTP.
tftp-root=/tftpboot
Then, restart dnsmasq.
Syslinux setup.
Copy the syslinux tools and (re)start all services:
root@homsrv:~# cd /usr/share/syslinux/
root@homsrv:/syslinux# cp chain.c32 hdt.32 ifcpu64.c32 menu.c32 poweroff.com \
                    pxelinux.0 reboot.c32 vesamenu.c32 whichsys.c32 /tftpboot/
root@homsrv:/syslinux# cp /usr/share/hwdata/pci.ids /tftpboot
root@homsrv:/syslinux# cd /tftpboot
root@homsrv:/tftpboot# ls -l
total 272
-rw-r--r-- 1 root root  20192 Jul 10 19:35 chain.c32
-rw-r--r-- 1 root root 342708 Jul 10 19:35 hdt.c32
-rw-r--r-- 1 root root   1312 Jul 10 19:35 ifcpu64.c32
-rw-r--r-- 1 root root  56164 Jul 10 19:35 menu.c32
-rw-r--r-- 1 root root 758940 Aug  4 12:22 pci.ids
-rw-r--r-- 1 root root    239 Jul 10 19:35 poweroff.com
-rw-r--r-- 1 root root  26652 Jul 10 19:35 pxelinux.0
drwxr-xr-x 2 root root   4096 Jul 10 19:34 pxelinux.cfg
-rw-r--r-- 1 root root    800 Jul 10 19:35 reboot.c32
-rw-r--r-- 1 root root 155792 Jul 10 19:35 vesamenu.c32
-rw-r--r-- 1 root root   2960 Jul 10 19:35 whichsys.c32
Syslinux menus.
Most menus are in /tftpboot/pxelinux.cfg. We use menus with an include file that is used by most menus, and complete it with a nice background image. The directory /tftpboot acts as the root directory of the tftp server, so if in a menu file you see /vesamenu.c32 then in reality this is /tftpboot/vesamenu.c32.
The background image is the file /tftpboot/pxelinux.cfg/kelin4.jpg. (Original from the Slackware Art gallery). The global include menu file is /tftpboot/pxelinux.cfg/default.inc, the contents is:
MENU TITLE Home Server Network Boot Menu
MENU BACKGROUND /pxelinux.cfg/kelin4.jpg

DEFAULT /vesamenu.c32

#MENU MARGIN 0
#MENU ROWS -9
#MENU TABMSG
#MENU TABMSGROW -3
#MENU CMDLINEROW -3
#MENU HELPMSGROW -4
#MENU HELPMSGENDROW -1

#MENU COLOR SCREEN 37;40
#MENU COLOR BORDER 34;40
#MENU COLOR TITLE 1;33;40
#MENU COLOR SCROLLBAR 34;46
#MENU COLOR SEL 30;47
#MENU COLOR UNSEL 36;40
#MENU COLOR CMDMARK 37;40
#MENU COLOR CMDLINE 37;40
#MENU COLOR TABMSG 37;40
#MENU COLOR DISABLED 37;40
#MENU COLOR HELP 32;40
A piece of /tftpboot/pxelinux.cfg/default:
# homsrv.wpl.ym network boot menu system.

DEFAULT /vesamenu.c32
MENU INCLUDE /pxelinux.cfg/default.inc
prompt 0

label bootlocal
  menu label ^Boot from default harddisk
  menu default
  KERNEL chain.c32
  APPEND hd0 0

LABEL slackware
  MENU LABEL ^Slackware i486 Installation Menu
  KERNEL /vesamenu.c32
  APPEND /pxelinux.cfg/slackware.conf
  TEXT HELP
  Slackware 32 bits installers.
  ENDTEXT

LABEL reboot
  MENU LABEL Reboot
  TEXT HELP
  Reboot this client computer
  ENDTEXT
  COM32 reboot.c32

LABEL poweroff
  MENU LABEL Power Off
  TEXT HELP
  Power off this client computer
  ENDTEXT
  COMBOOT poweroff.com
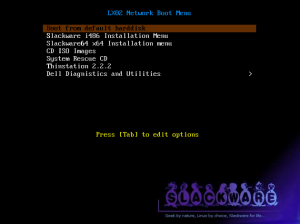
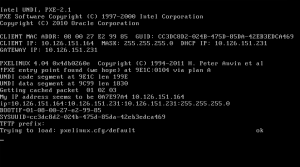
Here are the screeshots of a PXE boot:
Slackware Linux installers.
For this you need to have a copy (mirror) of the official Slackware distribution on your server. In this example I assume slackware 14.0 32 bit, so use the slackware-14.0 as base directory. Create a directory /tftpboot/slackware-14.0 on your server. The cd into the distribution, for example cd /mnt/mirror/slackware-14.0. Then copy isolinux/f2.txt isolinux/initrd.img and message.txt to /tftpboot/slackware-14.0. Next do a cp -a kernels /tftpboot/slackware-14.0.
Next you must make sure that your Slackware distribution is available on your server can be served using NFS. In a syslinux menu file /tftpboot/pxelinux.cfg/slackware.conf add the following menu items:
label stable140-hugesmp.s
  menu label ^1  Slackware 14.0, Huge SMP kernel
  kernel slackware-14.0/kernels/hugesmp.s/bzImage
  append initrd=slackware-14.0/initrd.img load_ramdisk=1 prompt_ramdisk=0 rw SL
ACK_KERNEL=hugesmp.s

label stable140-huge.s
  menu label ^2  Slackware 14.0, Huge non-SMP kernel
  kernel slackware-14.0/kernels/huge.s/bzImage
  append initrd=slackware-14.0/initrd.img load_ramdisk=1 prompt_ramdisk=0 rw SL
ACK_KERNEL=huge.s
Now you have a menu entry for a SMP and non-SMP kernel. In the Syslinux menu paragraph we had already created an entry to this slackware.conf file. You can now do a netboot and start the installer. Because the installer already has a network connection, when you need to enter the location for your source package, use the NFS option. Then point to the path which you have setup with the /etc/exports file to the packages directory of the Slackware distribution.
Download.
See the download page for the script and configuration files.

