Index.
- Introduction.
- Install VDE2.
- Install LXC.
- Download.
17-Jun-2011: initial release.
25-Aug-2011: update special hardware advice.
29-Aug-2011: replaced VDE network with host-only network.
06-Sep-2011: withdrawn special hardware advice.
06-Nov-2011: changed host-only network setup.
29-Dec-2011: removed host-only script parts.
14-Nov-2012: switched virtual server to Slackware.
05-Jan-2013: finished Slackware migration.
12-Jan-2013: removed not needed Slackware packages.
13-Aug-2013: updated extension pack installation procedure.
26-Apr-2014: added need for kernel-source package.
14-Apr-2014: rewritten for Linux Containers.
Introduction.
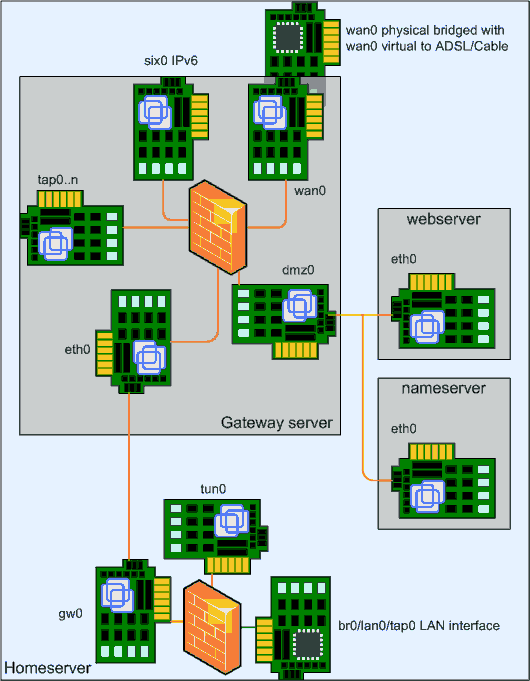
In the article Home Server Planning you could see how a virtual server fits into our home server design. This article will show how to add a virtual server and it shows how to make it start and stop automatic when your Home Server starts and stops. The virtualization solution is Linux Containers. I started using LXC on Slackware 14.1 which ships LXC version 0.9.0. To be able to create a Slackware container you also need the lxc-slack package from this site.
Before I used Linux Containers, I have used Virtualbox and before that VMware. They both do full virtualisation. The advantage is you can run a different distribution or OS other then what runs on the host. The disadvantage is that it costs more memory and it is a bit slower then the host. A container on the other hand is fast, because it uses the kernel from the host. That is the reason why you need a recent Linux, you need special features from the kernel. The disadvantage is that for the best results you need to run the same distribution as the host, or at least it must be kernel compatible. The easiest thing is to use the same as the host, so in our case that is Slackware 14.1. Because a container uses the host kernel, it boots a lot faster because the kernel is already running.
Another advantage of containers over full virtualisation is the energy and heat production by the host server. The disk temperature dropped almost 10 degrees Celsius, and the CPU core temperature 5 degrees. This results in lower energy usage while the performance of the virtual machines improved dramatically.
We need to reserve two new networks, we take the ranges from the whole reserved network space, see the updated table below. The network between the server and gateway will be a lxc host-only network, the network between the gateway and the web server will be an internal network. These networks will be build using a Virtual Distributed Ethernet, the vde2 package, also from this site.
| IPv4 | Remark |
|---|---|
| 10.126.160.0/24 | Workstations LAN |
| 10.126.161.0/24 | Server/Gateway gw0 LAN |
| 10.126.162.0/24 | DMZ LAN |
| 10.126.163.0/24 | Spare |
| 10.126.164.0/24 | Spare |
| 10.126.165.0/24 | Spare |
| 10.126.166.0/24 | Spare |
| 10.126.167.0/24 | Spare |
First, a reminder of what the configuration will look like in the future. In this article the network between the host (gw0) and the Gateway server (eth0) will be added.
Install VDE2.
Build and install the Virtual Distributed Ethernet package (vde2) from this site. We will configure two networks, the host to gateway network and the network that we will use later for the webserver. We create them both right now, even that we only need one for now. With the vde2 package we will create two virtual ethernet switches.
Edit /etc/rc.d/rc.vde2.conf and set the following values, but use your own networks of course:
# VDENAME[n] should have no spaces

# Network for DMZ machines.
VDENAME[0]="net-dmz"
TAPNAME[0]=""
TAPCIDR[0]=""
VDESLIRP[0]=""
VDEDHCP[0]=""
IP6ADDR[0]=""

# Network between homsrv and gateway
VDENAME[1]="net-gw"
TAPNAME[1]="gw0"
TAPCIDR[1]="10.126.161.2/24"
VDESLIRP[1]=""
VDEDHCP[1]=""
IP6ADDR[1]=""
The first network is the dmz (De Militarized Zone) which we will use later when we add a web server. The one that we will use right now is the net-gw, this is the virtual network cable between our home server and the virtual gateway server. This virtual ethernet switch has a tap device on one end, gw0. This virtual ethernet card is created by the rc.vde2 and configured with an IPv4 address. (IPv6 will be another story).
There is a tricky problem now. You need to configure this network very early in the boot process of our Slackware machine, so we cannot use the rc.local script. For this purpose I wrote a special network-scripts package, but to make a difference my package is called network-scripts-ipv6. Install this package from this server, and make sure to use the new rc.inet1 and rc.inet1.conf files. This package will later help you with IPv6 but it does more. It also runs some extra scripts that help to configure the network with virtual machines. One of these scripts, rc.inet1-main will take care of running the rc.vde2 script, and also the rc.lxc script to start the Linux Containers.
So the whole boot order is now:
- Kernel boot, system init upto rc.inet1 networking.
- Run rc.inet1-pre, this script may be used to bring up tap interfaces etc.
- Configure the standard network using rc.inet1.conf but do not the the default gateway.
- Run rc.inet1-main, this script starts the VDE2 network, virtual machines etc.
- Configure the default gateways using rc.inet1.conf.
- Run rc.inet1-post, use this to add extra routes etc.
- Continue with the normal boot process.
As long as you don’t change the default gateway at this point, the home server is still functional and has Internet access.
Install LXC.
Slackware and Linux Containers, you need Slackware 14.1 and not older. But the shipped version in slackware 14.1 doesn’t have a script to install a Slackware container. Things will change in the upcoming version, but for now, your home server must be running Slackware 14.1. Then install the lxc-slack packkage from this server. This package adds the template to create a minimal Slackware container and has a /etc/rc.d/rc.lxc script. So if you have the lxc-0.9.0 and the lxc-slack-0.4_14.1 packages installed you can install the gateway container.
During the installation of a container, you need an internet connection because all packages are downloaded and then installed.
root@homsrv:~# lxc-create -n 01-gateway -t slackware

lxc-create: No config file specified, using the default config /etc/lxc/default.conf
installpkg is /sbin/installpkg

Checking cache download in /var/cache/lxc/slackware/cache-14.1-i486 ...
Installing packages in /var/cache/lxc/slackware/rootfs-14.1-i486 ...
cleaning up existing /var/cache/lxc/slackware/rootfs-14.1-i486 ...
aaa_base-14.1-i486-1: Basic Linux filesystem package [90K]
aaa_elflibs-14.1-i486-3: shared libraries needed by many programs [14M]
aaa_terminfo-5.8-i486-1: a basic collection of terminfo entries [720K]
....
wget-1.14-i486-2: a non-interactive network retriever [2.0M]
which-2.20-i486-1: shows the full path to shell commands [90K]
xz-5.0.5-i486-1: compression utility based on the LZMA algorithm [1010K]

Configuring...

Adding an etc/fstab that must be edited later
with the full path of the container if you move it.
Root password is 'root', please change it!

Copying rootfs to /var/lib/lxc/name/rootfs...
'slackware' template installed
'01-gateway' created
root@homsrv:~#
Now you can start this new machine:
root@homsrv:~# lxc-start -n 01-gateway
INIT: version 2.88 booting
INIT: Entering runlevel: 3
Going multiuser...
Updating shared library links: /sbin/ldconfig &
Starting sysklogd daemons: /usr/sbin/syslogd /usr/sbin/klogd -c 3 -x
Starting OpenSSH SSH daemon: /usr/sbin/sshd
Generating public/private rsa1 key pair.
Your identification has been saved in /etc/ssh/ssh_host_key.
Your public key has been saved in /etc/ssh/ssh_host_key.pub.
The key fingerprint is:
26:35:30:60:3b:c2:8e:1c:7a:6b:37:25:5e:29:7e:a6 root@name
Generating public/private dsa key pair.
Your identification has been saved in /etc/ssh/ssh_host_dsa_key.
Your public key has been saved in /etc/ssh/ssh_host_dsa_key.pub.
The key fingerprint is:
81:5a:9e:6a:34:91:fa:0c:db:af:e9:5f:36:63:fd:c7 root@name
Generating public/private rsa key pair.
Your identification has been saved in /etc/ssh/ssh_host_rsa_key.
Your public key has been saved in /etc/ssh/ssh_host_rsa_key.pub.
The key fingerprint is:
70:67:3b:9d:8a:00:49:0b:97:5b:a9:ff:a8:6d:6e:87 root@name
Generating public/private ecdsa key pair.
Your identification has been saved in /etc/ssh/ssh_host_ecdsa_key.
Your public key has been saved in /etc/ssh/ssh_host_ecdsa_key.pub.
The key fingerprint is:
60:ed:2b:9b:d0:7f:cd:4a:08:df:d6:0d:e8:d6:dd:2e root@name
none on /dev/shm type tmpfs (rw)

* container 01-gateway started. *
On another console you can connect to a console of that machine:
root@homsrv:~# lxc-console -n 01-gateway

Type <Ctrl+a q> to exit the console, <Ctrl+a Ctrl+a> to enter Ctrl+a itself


Welcome to Linux 3.10.17-smp (tty1)

gateway login:
Now login, change root’s password from root to something you personally like to use and halt the machine. Next we will configure networking for that machine. Edit /var/lib/lxc/01-gateway/:
# Template used to create this container: slackware
# Template script checksum (SHA-1): 636a78b479e57f5053f0b07bb407133a9f068d11

# Start and stop the physical tap interface on the vde2 switch.
lxc.hook.pre-start = /var/lib/lxc/01-gateway/network-start.sh
lxc.hook.post-stop = /var/lib/lxc/01-gateway/network-stop.sh

# Physical device plugged into a vde switch.
lxc.network.type = phys
lxc.network.flags = up
lxc.network.link = gw1
lxc.network.hwaddr = AC:DE:48:7E:A1:01
lxc.network.name = eth0
lxc.network.veth.pair = veth161001

lxc.network.type = phys
lxc.network.flags = up
lxc.network.link = wan0
lxc.network.name = wan0
lxc.network.veth.pair = veth168102

lxc.network.type = phys
lxc.network.flags = up
lxc.network.link = dmz1
lxc.network.hwaddr = AC:DE:48:7E:A2:01
lxc.network.name = dmz0
lxc.network.veth.pair = veth162001

lxc.utsname = gateway

lxc.mount = /var/lib/lxc/01-gateway/rootfs/etc/fstab

lxc.tty = 4
lxc.pts = 1024
lxc.rootfs = /var/lib/lxc/01-gateway/rootfs

lxc.cgroup.devices.deny = a
# /dev/null and zero
lxc.cgroup.devices.allow = c 1:3 rwm
lxc.cgroup.devices.allow = c 1:5 rwm
# consoles
lxc.cgroup.devices.allow = c 5:1 rwm
lxc.cgroup.devices.allow = c 5:0 rwm
lxc.cgroup.devices.allow = c 4:0 rwm
lxc.cgroup.devices.allow = c 4:1 rwm
# /dev/{,u}random
lxc.cgroup.devices.allow = c 1:9 rwm
lxc.cgroup.devices.allow = c 1:8 rwm
lxc.cgroup.devices.allow = c 136:* rwm
lxc.cgroup.devices.allow = c 5:2 rwm
# rtc
lxc.cgroup.devices.allow = c 254:0 rwm
# tap/tun devices
lxc.cgroup.devices.allow = c 10:200 rwm

# we don't trust root user in the container, better safe than sorry.
# comment out only if you know what you're doing.
lxc.cap.drop = sys_module mknod
lxc.cap.drop = mac_override kill sys_time
lxc.cap.drop = setfcap setpcap sys_boot

# if you want to be even more restrictive with your container's root
# user comment the three lines above and uncomment the following one
# lxc.cap.drop=sys_admin
Next create /var/lib/lxc/01-gateway/network-start.sh
#!/bin/sh

logger "network-start container 01-gateway-plug gw1"
PID="/var/run/lxc-01-gateway-gw1.pid"
/usr/bin/vde_plug2tap -g vboxusers -m 0660 -s /var/run/vde.ctl.net-gw -P ${PID} -d gw1

logger "network-start container 01-gateway-plug dmz1"
PID="/var/run/lxc-01-gateway-dmz1.pid"
/usr/bin/vde_plug2tap -g vboxusers -m 0660 -s /var/run/vde.ctl.net-dmz -P ${PID} -d dmz1
And create /var/lib/lxc/01-gateway/network-stop.sh
#!/bin/sh

logger "network-stop container 01-gateway network-plug gw1"
PID="/var/run/lxc-01-gateway-gw1.pid"
#
# Stop vde_plug2tap
#
if [ -f ${PID} ]; then
 /bin/kill $(/usr/bin/cat ${PID})
 /usr/bin/rm -f ${PID}
fi

logger "network-stop container 01-gateway network-plug dmz1"
PID="/var/run/lxc-01-gateway-dmz1.pid"
#
# Stop vde_plug2tap
#
if [ -f ${PID} ]; then
 /bin/kill $(/usr/bin/cat ${PID})
 /usr/bin/rm -f ${PID}
fi
Chmod 755 these two new scripts. These two scripts are used to create network interfaces and “plug” them into the virtual ethernet switches we created earlier. If we now start the container again we can configure the network interfaces like we are used to do. Read the next article to see how.
Download.
The needed scripts and configuration files upto this article can be downloaded from the following location. The Firewall Builder configuration files are included, see the examples/homsrv/etc/iptables directory. Just unpack this archive in your home directory to see what you can use.
See the download pages for the script and configuration files.