Index.
- Introduction.
- Multi-instances overview.
- Install postfix.
- Initialize multi-instances.
- Create the in instance.
- Open the firewall.
- Postfix tricks.
- Download.
03-Jun-2011: initial release.
23-Jul-2011: cosmetic changes.
28-Aug-2011: updated virtual table.
31-Aug-2011: updated SASL authentication.
07-Jan-2013: adjusted for Slackware.
26-Aug-2013: added postscreen setup, fixed main instance
28-Aug-2013: changed link to new certificates page.
26-Nov-2013: made a better drawing.
Introduction.
In this article I will describe how to setup a full mail domain on a home server. It is easy to get your own domain these days, you only need to make sure that your ISP doesn’t block TCP port 25 to your connection so that mail from the Internet can actually reach your server. You need also to be able to set MX records for your domain in the public DNS system. My ISP does do all these things and their regular mail server acts as backup for my own server. This is a good thing to have, if your server is down for some reason, your ISP holds your mail until you come on line again. We will use postfix as our mail server, just because it does everything we need very well.
In a classical Postfix setup, Postfix takes care of sending local created mail, sending mail from local workstation, receiving mail from the internet, filter and route mail, all in a single setup. To do this a complex interplay of settings may be required, for example with master.cf options overriding main.cf settings. Postfix can split the configuration in parts, so that you can tune each part of the setup to do exactly what needs to be done. This is called a multi-instance setup.
On our Home Server there are two instances, the first sends mail from the command line or work stations to the Internet. The second instance receives mail from the Internet and delivers the mail in the users mailboxes.
We have our local internal domain wpl.ym and the official internet domain wpl.uk. In the DNS we register two names, mail.wpl.uk and mailhub.wpl.uk to have our external address. On the first we will receive the mail from the Internet, the second name is for our sending instance. The mail.wpl.uk needs a MX record for the wpl.uk domain. If your ISP does the backup, make sure mail.wpl.uk has a lower MX number then the backup server. For example, this looks like the output of a system that is configured in the DNS like described here:
mb@seaport:~$ host wpl.uk
wpl.uk has address 1.2.3.4
wpl.uk mail is handled by 30 mail.wpl.uk.
wpl.uk mail is handled by 100 forward1.dds.nl.
wpl.uk mail is handled by 100 forward2.dds.nl.
mb@seaport:~$
Multi-instances overview.
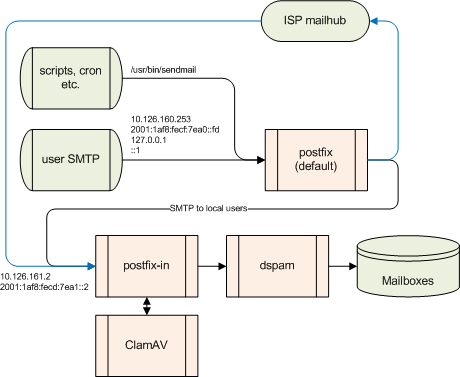
Homeserver Mail Setup.
Here is a drawing of how the multi-instance setup will be done on our Home Server. The top part is the default instance that sends mail from the command line and accepts mail from the client computers email programs. Mail for internal users goes directly to the second instance, the rest is sent to the Internet.
The bottom part is the second instance. This accepts the mail from the Internet and stores the mail in the users mailboxes. This instance does a lot of checks to see if the mail comes from a real legal mail server, and to check if the mail is really for one of our users. In this article postfix delivers the mail directly to the users mail directories, in other articles delivery via dspam will be explained. Both postfix instances use the ClamAV milter daemon to check the mail for possible viruses.
Install postfix.
Before you do this create a server certificate for the mail.wpl.uk server and place the certificate and key files in /etc/certs. Then build the postfix package using a Slackbuild and install it. Make sure to add the CCARGS -DUSE_TLS -DUSE_SASL_AUTH -DDEF_SERVER_SASL_TYPE=\”dovecot\” in your build. Uninstall the sendmail package before you install postfix, they do conflict. It can be a good idea to install make as well, the make utility is a comfortable way to update the configuration databases. First we setup postfix to only send local originated mail. Later this setup will be converted to a multi-instance, but we start with the classic method. Edit /etc/postfix/main.cf:
# We are mail.wpl.uk
#
daemon_directory = /usr/libexec/postfix

myhostname = mailhub.wpl.uk
mydomain = wpl.uk

# Flat user-account namespace in wpl.uk:
#
#   user@wpl.uk not user@mail.wpl.uk
#
myorigin = $mydomain

# The command_directory parameter specifies the location of all
# postXXX commands.
#
command_directory = /usr/sbin

# Protocols, IPv4 and IPv6
#
inet_protocols = all

# RECEIVING MAIL
#
inet_interfaces = 10.126.160.253, 127.0.0.1, [2001:1af8:fecf:7ea0::fd], [::1]

# No local delivery:
#
mydestination =
local_transport = error:5.1.1 Mailbox unavailable
alias_database =
alias_maps =
local_recipient_maps =

# Send everything to the external relayhost.
# Some mail for the internal networks will go via transport.
#
relayhost = mail.example.com
message_size_limit = 102400000

# TRANSPORT MAP
#
transport_maps = hash:/etc/postfix/transport

# TRUST AND RELAY CONTROL
#
mynetworks = 10.126.160.0/21, 127.0.0.0/8, [2001:1af8:fecf::]/48, [::1]/128

# TLS
#
smtp_tls_CAfile = /etc/certs/wpl-ca.crt
smtp_tls_session_cache_database = btree:/var/lib/postfix/smtp_tls_session_cache
smtp_tls_security_level = may
smtp_tls_note_starttls_offer = yes
tls_random_source = dev:/dev/urandom
smtp_tls_loglevel = 1
# ClamAV Milter
#
#smtpd_milters     = unix:/var/run/clamav/clamav-milter.sock
#non_smtpd_milters = unix:/var/run/clamav/clamav-milter.sock

# These lines are maintained by the postmulti command
#
There are no lines below the last comment yet, they will get there later. The setup above uses IPv4 and IPv6. You can see that we named this setup mailhub.wpl.uk, so you need a DNS entry with that name and the external (Internet side) IP address of your network. That is the name this postfix will tell to the relay host to deliver mail.
Then, create /etc/postfix/transport:
# run 'postmap /etc/postfix/transport' after changing this file.
#
# Internal mailers
#
wpl.uk          smtp:[10.126.161.2]
wpl.ym          smtp:[10.126.161.2]
.wpl.uk         smtp:[10.126.161.2]
.wpl.ym         smtp:[10.126.161.2]
Create a Makefile:
# /etc/postfix/Makefile
#

all:    transport.db

%.db:   %
        postmap $<
This Makefile is not necessary to let postfix function, it’s a comfortable way to update the databases. Just run make in the /etc/postfix directory after you changed the transport file.
Now start postfix:
root@homsrv:~# /etc/rc.d/rc.sendmail start
postfix/postfix-script: starting the Postfix mail system
root@homsrv:~#
With the following method you can try to send a mail from the command line to see if it works:
root@homsrv:~# mail xxxxxx@xxxx.xxx
Subject: test mail delivery
Hello,

this is a testmail.

Me
.
EOT
root@homsrv:~#
If it worked, go to the next level.
Initialize multi-instances.
Use the following command to setup multi-instances (and to list them):
root@homsrv:~# postmulti -e init
root@homsrv:~# postmulti -l -a
-               -               y         /etc/postfix
root@homsrv:~#
All what this command did was add the lines
multi_instance_wrapper = ${command_directory}/postmulti -p --
multi_instance_enable = yes
to /etc/postfix/main.cf to indicate that multi-instances is active.
Create the in instance.
This instance is the part that receives the mail from the Internet, but also from the first instance if the mail is for local users. This instance listens only to the external ethernet card. To allow TLS connections we need a signed certificate for the hostname mail.wpl.uk. This setup does also the use of RBL. There are several checks to stop spammers and other evil sources to deliver mail. With this setup most mass mailer scripts will be stopped. If the mail passed the checks, the mail will be delivered to the mailboxes. In other articles better spam protection will be added. Now, create the postfix-in instance:
root@homsrv:~# postmulti -I postfix-in -e create
root@homsrv:~#
This creates the /etc/postfix-in directory with a default main.cf and master.cf file. Before you do this create a server certificate for the mail.wpl.uk server and place the certificate and key files in /etc/certs. For better junk mail control, I have enabled postscreen. This is available since postfix 2.8. Edit the main.cf file:
# /etc/postfix-in/main.cf at homsrv.wpl.ym
#
# Postfix input instance, receive internet mail

daemon_directory = /usr/libexec/postfix

# LOCAL PATHNAME INFORMATION
#
queue_directory = /var/spool/postfix-in
command_directory = /usr/sbin
data_directory = /var/lib/postfix-in

# QUEUE AND PROCESS OWNERSHIP
#
mail_owner = postfix

# INTERNET HOST AND DOMAIN NAMES
#
myhostname = mail.wpl.uk
mydomain = wpl.uk

# Protocols, IPv4 and IPv6
#
inet_protocols = all

# RECEIVING MAIL
#
inet_interfaces = 10.126.161.2, [2001:1af8:fecf:7ea1::2]

# The mydestination parameter specifies the list of domains that this
# machine considers itself the final destination for.
#
mydestination = $myhostname, localhost.$mydomain, localhost, $mydomain,
                mail.$mydomain

# ALIAS DATABASE
#
alias_maps = hash:/etc/postfix-in/aliases
alias_database = hash:/etc/postfix-in/aliases

# DELIVERY TO MAILBOX
#
#mailbox_command = /usr/bin/dspam --deliver=innocent --user $USER -- -d %u
home_mailbox = Maildir/

# ADDRESS REDIRECTION (VIRTUAL DOMAIN)
#
virtual_alias_maps = hash:/etc/postfix-in/virtual

# For SASL authenticated remote users of the wpl.uk
# domain, their relayhost to send Internet mail.
#
relayhost = mail.example.com
# TRANSPORT MAP
#
# See the discussion in the ADDRESS_REWRITING_README document.
transport_maps = hash:/etc/postfix-in/transport

# SASL (Enable this after Dovecot is installed)
#
#smtpd_sasl_type = dovecot
#smtpd_sasl_auth_enable = yes
#smtpd_sasl_path = private/auth
#smtpd_tls_auth_only = yes
#smtpd_sasl_security_options = noanonymous
# TLS
#
smtp_tls_CAfile = /etc/certs/wpl-ca.crt
smtp_tls_session_cache_database =
  btree:/var/lib/postfix-in/smtp_tls_session_cache
smtp_tls_security_level = may
smtp_tls_note_starttls_offer = yes
smtp_tls_loglevel = 1
#
smtpd_tls_CAfile = /etc/certs/wpl-ca.crt
smtpd_tls_cert_file = /etc/certs/wpl-mail.crt
smtpd_tls_key_file = /etc/certs/wpl-mail.pem
smtpd_tls_received_header = yes
smtpd_tls_session_cache_database =
  btree:/var/lib/postfix-in/smtpd_tls_session_cache
tls_random_source = dev:/dev/urandom
smtpd_tls_security_level = may
smtpd_tls_loglevel = 1
smtpd_client_port_logging = yes
# JUNK MAIL CONTROLS
#
# The controls listed here are only a very small subset. The file
# SMTPD_ACCESS_README provides an overview.
#
# HELO restrictions.
smtpd_delay_reject = yes
smtpd_helo_required = yes
disable_vrfy_command = yes
strict_rfc821_envelopes = yes
invalid_hostname_reject_code = 554
multi_recipient_bounce_reject_code = 554
non_fqdn_reject_code = 554
relay_domains_reject_code = 554
unknown_address_reject_code = 554
unknown_client_reject_code = 554
unknown_hostname_reject_code = 554
unknown_local_recipient_reject_code = 554
unknown_relay_recipient_reject_code = 554
unknown_virtual_alias_reject_code = 554
unknown_virtual_mailbox_reject_code = 554
unverified_recipient_reject_code = 554
unverified_sender_reject_code = 554
#
smtpd_helo_restrictions =
    check_helo_access hash:/etc/postfix-in/helo_access,
    reject_non_fqdn_hostname,
    reject_invalid_hostname,
    reject_unknown_helo_hostname,
    permit
#
# Sender restrictions
smtpd_sender_restrictions =
    reject_non_fqdn_sender,
    reject_unknown_sender_domain,
    permit
#
# Recipient restrictions
smtpd_recipient_restrictions =
    reject_unauth_pipelining,
    reject_non_fqdn_recipient,
    reject_unknown_recipient_domain,
    permit_mynetworks,
    permit_sasl_authenticated,
    reject_unauth_destination,
    permit

# postscreen setup
#
postscreen_access_list =
    permit_mynetworks,
    cidr:/etc/postfix-in/postscreen_access.cidr
#
postscreen_blacklist_action = drop
postscreen_dnsbl_threshold = 3
postscreen_dnsbl_sites = zen.spamhaus.org*3
    bl.spameatingmonkey.net*2
    bl.ipv6.spameatingmonkey.net*2
    dnsbl.ahbl.org*2
    bl.spamcop.net
    dnsbl.sorbs.net
    swl.spamhaus.org*-4

postscreen_dnsbl_action = enforce
postscreen_dnsbl_reply_map =
    pcre:/etc/postfix-in/postscreen_dnsbl_reply_map.pcre
postscreen_greet_action = enforce
postscreen_helo_required = yes
postscreen_disable_vrfy_command = yes
# ClamAV Milter
#
smtpd_milters = unix:/var/run/clamav/clamav-milter.sock

# Instance setup
#
authorized_submit_users =
multi_instance_name = postfix-in
multi_instance_enable = no
For this moment we have set the mail delivery to the internal Maildir/, later we will change the final destination. We have also disabled SASL authentication, it can be enabled after Dovecot is installed. It is configured so that SASL can only be used with TLS connections so that passwords are never send in the clear.
Next, enable submission and postscreen in /etc/postfix-in/master.cf like this:
# ==========================================================================
# service type  private unpriv  chroot  wakeup  maxproc command + args
#               (yes)   (yes)   (yes)   (never) (100)
# ==========================================================================
#smtp      inet  n       -       n       -       -       smtpd
smtp      inet  n       -       n       -       1       postscreen
smtpd     pass  -       -       n       -       -       smtpd
dnsblog   unix  -       -       n       -       0       dnsblog
tlsproxy  unix  -       -       n       -       0       tlsproxy
submission inet n       -       n       -       -       smtpd
#  -o smtpd_tls_security_level=encrypt
#  -o smtpd_sasl_auth_enable=yes
#  -o smtpd_client_restrictions=permit_sasl_authenticated,reject
#  -o milter_macro_daemon_name=ORIGINATING
Then, create the file aliases:
#
#       >>>>>>>>>>      The program "newaliases" must be run after
#       >> NOTE >>      this file is updated for any changes to
#       >>>>>>>>>>      show through to Postfix.
#

# Basic system aliases -- these MUST be present
MAILER-DAEMON:  postmaster
postmaster:     root
hostmaster:     root
virusalert:     root

# General redirections for pseudo accounts
bin:            root
daemon:         root
games:          root
ingres:         root
named:          root
nobody:         root
uucp:           root
usenet:         root
news:           root
webmaster:      root
faxadmin:       root
www:            root
ftp-bugs:       root
postfix:        root
administrator:  root
support:        root

# Put your local aliases here.

# Well-known aliases
manager:        root
dumper:         root
operator:       root
info:           root
abuse:          postmaster
squid:          root

# trap decode to catch security attacks
decode:         root

# Domain administrator alias
root:           admin

# Person who should get admin's mail
admin:          you@wpl.uk

# Spam control
spam:"|/usr/bin/dspam --user root --class=spam --source=error"
notspam:"|/usr/bin/dspam --user root --class=innocent --source=error"
ham:"|/usr/bin/dspam --user root --class=innocent --source=error"
The last three lines in the aliases file are for dspam in another article. Next create /etc/postfix-in/helo_access. This file must contain the names and IP addresses that our server has on the Internet to prevent abuse. Also in this file you need to allow access from the default instance, else we will not accept from our own local server. The file looks like:
# /etc/postfix-in/helo_access
#--------------------------------------------------------
# run  "postmap  /etc/postfix-in/helo_access"  after each edit
#
# First a remote laptop example
laptop.wpl.uk           OK

# Postfix-out instance
#
mailhub.wpl.uk          OK

#
# Now the real entries
wpl.uk                  REJECT You are not me.
192.168.254.3           REJECT You are not me.
Then create transport, empty for now:
# run 'postmap /etc/postfix-in/transport' after changing this file.
#
# Internal mailers
#
The file /etc/postfix-in/virtual is used translate the fake internal domain name to the real domain name, just in case some program or someone uses the fake domain name. So, mail for john@wpl.ym will be delivered to john@wpl.uk. But you can also add name translations like below, john.doe will be changed into jdoe.
#
# postmap /etc/postfix-in/virtual
#
#
# Domain rewriting
#
@wpl.net        @wpl.uk
@wpl.ym         @wpl.uk
@gateway.wpl.ym @wpl.uk
@websrv.wpl.ym  @wpl.uk
#
#
# Usernames rewriting.
#
john.doe@wpl.uk           jdoe@wpl.uk
Create postscreen_access.cidr:
# /etc/postfix-in/postscreen_access.cidr
# Rules are evaluated in the order as specified.
# Blacklist 192.168.* except 192.168.254.101
#
10.126.160.0/21         permit
Create postscreen_dnsbl_reply_map.pcre:
# /etc/postfix-in/postscreen_dnsbl_reply_map.pcre
# We will be rejecting much mail which is listed in multiple DNSBLs.
# This checks the DNSBL name postscreen(8) gets from dnsblog(8), and
# if it's not one of our Tier 1 DNSBL sites, it changes what the
# sender will see:

#/^bl\.spameatingmonkey\.net$/  bl.spameatingmonkey.net
!/^zen\.spamhaus\.org$/         multiple DNS-based blocklists
For convenience create a Makefile:
# /etc/postfix/Makefile
#

all:    transport.db helo_access.db virtual.db aliases.db

aliases.db:     aliases
        newaliases -C `pwd`

%.db:   %
        postmap $<
Then run make to create the databases and start the second instance:
root@homsrv:~# postmulti -i postfix-in -e enable
root@homsrv:~# postmulti -i postfix-in -p start
postfix-in/postfix-script: starting the Postfix mail system
root@homsrv:~#
Now both instances of postfix should be running.
Open the firewall.
For IPv6 it is simple, open the firewall in the gateway on the six0 interface with the destination address 2001:1af8:fecf:7ea1::2 port 25 and 587 and that is enough (Policy table).
For IPv4 it is more complicated, we must open ports 25 and 587 in the gateway on the eth1 network interface (Policy table). Then in the NAT table, we must create a DNAT rule (some call it port forwarding), that translates traffic to port 25 and 587 on the eth1 interface, to address 10.126.161.2.
To check of it works, see that you get shell access somewhere on the Internet and telnet to your external IPv4 address port 25, you should get the postfix prompt. If possible, try IPv6 2001:1af8:fecf:7ea1::2 to port 25 too. Repeat these tests for port 587. There is a difference in your logfiles, with port 25 the connection is handled by postscreen, and with port 587 by smtpd.
If this all works, you should be able to send and receive mail. Receiving mail is a bit difficult to check because we don’t have dovecot installed yet that we need to fetch email from our server. But the logfiles tell you if mail was delivered. You can also peek in your admin users home directory, in the Maildir/new subdirectory to be more precise, you find the raw email messages which you can inspect with cat or less.
Postfix tricks.
Some commands that may be handy:
root@homsrv:~# postmulti -l
-               -               y         /etc/postfix
postfix-in      recv            y         /etc/postfix-in
root@homsrv:~# postmulti -x mailq
-Queue ID- --Size-- ----Arrival Time---- -Sender/Recipient-------
4E2FD32A03CB!    1136 Fri Jan  7 16:21:51  mbse@xxxx.xxx
 admin@wpl.uk

DF5EB32A19A7!    1303 Fri Jan  7 16:27:17  jdoe@xxxx.xxx
 admin@wpl.uk

-- 3 Kbytes in 2 Requests.
Mail queue is empty
root@homsrv:~# postsuper -c /etc/postfix-in/ -H 4E2FD32A03CB
postsuper: 4E2FD32A03CB: released from hold
postsuper: Released from hold: 1 message
root@homsrv:~# mailq -C /etc/postfix-in/ -q
root@homsrv:~# newaliases -C /etc/postfix-in
root@homsrv:~#
Download.
See the download page for the script and configuration files.