Index
- Introduction.
- Configure the DMZ server.
25-Aug-2011: initial release.
22-Aug-2012: updated using new configs.
17-Jan-2013: adjusted for Slackware.
19-Apr-2015: adjusted as Linux Container.
Introduction.
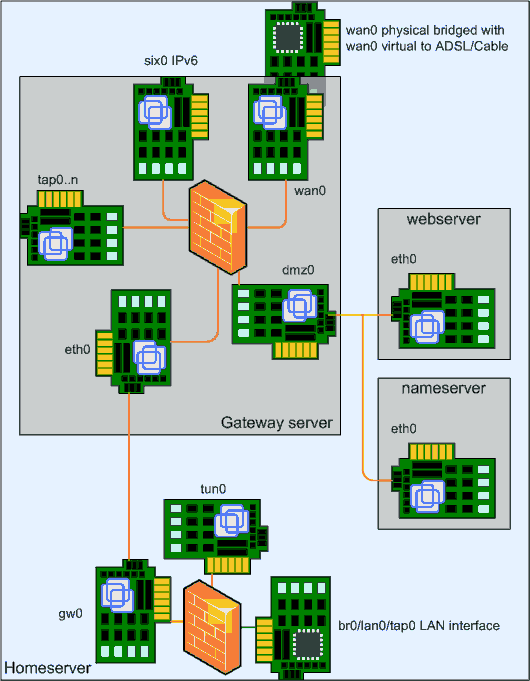
Using the article about adding a Virtual Machine you can now create another Linux Container using the lxc-create command. In the examples this machine is created as 11-nginx which will be our public web server. Connect the network card of this new machine to the Internal Network WPL-DMZ, the third adapter of the gateway (dmz0) should already be connected to that network. Here is the configuration file /var/lib/lxc/11-nginx/config:
# Template used to create this container: slackware
# Template script checksum (SHA-1): 636a78b479e57f5053f0b07bb407133a9f068d11

# Start and stop the physical tap interface on the vde2 switch.
lxc.hook.pre-start = /var/lib/lxc/11-nginx/network-start.sh
lxc.hook.post-stop = /var/lib/lxc/11-nginx/network-stop.sh

lxc.network.type = phys
lxc.network.flags = up
lxc.network.link = dmz4
lxc.network.hwaddr = AC:DE:48:7E:A2:04
lxc.network.name = eth0
lxc.network.veth.pair = veth162004

lxc.utsname = nginx

lxc.mount.entry=/var/run/mysql var/run/mysql none bind,ro 0 0
lxc.mount = /var/lib/lxc/11-nginx/rootfs/etc/fstab

lxc.tty = 4
lxc.pts = 1024
lxc.rootfs = /var/lib/lxc/11-nginx/rootfs

lxc.cgroup.devices.deny = a
# /dev/null and zero
lxc.cgroup.devices.allow = c 1:3 rwm
lxc.cgroup.devices.allow = c 1:5 rwm
# consoles
lxc.cgroup.devices.allow = c 5:1 rwm
lxc.cgroup.devices.allow = c 5:0 rwm
lxc.cgroup.devices.allow = c 4:0 rwm
lxc.cgroup.devices.allow = c 4:1 rwm
# /dev/{,u}random
lxc.cgroup.devices.allow = c 1:9 rwm
lxc.cgroup.devices.allow = c 1:8 rwm
lxc.cgroup.devices.allow = c 136:* rwm
lxc.cgroup.devices.allow = c 5:2 rwm
# rtc
lxc.cgroup.devices.allow = c 254:0 rwm

# we don't trust root user in the container, better safe than sorry.
# comment out only if you know what you're doing.
lxc.cap.drop = sys_module mknod
lxc.cap.drop = mac_override kill sys_time
lxc.cap.drop = setfcap setpcap sys_boot

# if you want to be even more restrictive with your container's root
# user comment the three lines above and uncomment the following one
# lxc.cap.drop=sys_admin
I have added a line lxc.mount.entry so that the /var/run/mysql directory of the home server is also mounted inside this server. Now you can use the host MySQL server inside this container without using a TCP/IP connection by using the socket in the same way as on the home server. This is a lot faster then using a network connection.
To autostart this machine at boot of the home server, create the file /var/lib/lxc/11-nginx/autostart and write 1 in that file:
root@homsrv:~# echo 1 > /var/lib/lxc/11-nginx/autostart
root@homsrv:~#
Inside this virtual machine, configure the network (IPv4 only right now) using the static IP address 10.126.162.4 with default gateway 10.126.162.1. Then set the hostname to nginx, the domain to wpl.uk. As nameserver, you can use 10.126.160.253.
Configure the DMZ server.
After the server is configured and booted for the first time, install the upgraded packages and upgrade network-scripts from this site so that you can configure IPv6. Then configure the following IPv6 addresses:
2001:1af8:fecf:7ea2::4/64
2001:1af8:fecf:7ea2::200/64
2001:1af8:fecf:7ea2::201/64
2001:1af8:fecf:7ea2::202/64
Then add 2001:1af8:fecf:7ea2::1 as IPv6 gateway address. The server has now 4 IPv6 addresses. The first one is the generic address. The other three will be used for the three websites.
Install and activate sshd and iptables and add this server to the firewall to complete the basic server setup.