Index
- Introduction.
- Planning the design.
- Choosing the hardware.
- The software.
03-Jun-2011: Initial release.
24-Jul-2012: Updated last paragraph.
07-Nov-2012: Updated for Slackware.
02-Jan-2013: Updated some software remarks.
21-Dec-2014: Updated for Linux Containers.
Introduction.
This set of articles tries to show a solution for a homeserver that is a bit different then the average homeserver. The goal is to make a flexible and scalable solution for a reasonable price. First we have to think about what it could look like.

a typical home server setup.
The diagram above shows such a setup. The workstations and laptops are connected via a switch with the homeserver. On that server run applications like Samba for windows files shares, email server, a dhcp server to configure the client computers and a lot of other goodies. The homeserver should do just that. The other side should be connected to a gateway and firewall that does all the network protection and routing. It should also divert incoming traffic for our webserver via a DMZ (Demilitarized Zone) to our public webserver. The external side could be anything that connects you to the Internet. It would be nice to host our own domain on this network too so that you can have www.mydomain.com and email addresses like peter.pan@mydomain.com.
Planning the design.
In the setup above you see three servers, two of them will not be build as physical servers but as virtual servers. That saves you a lot of power, heat and space. For maintenance it doesn’t matter, all these servers would have been headless anyway (not quite as we will see later how to setup rdesktop). Modern computers are powerful enough to do this.
The homeserver will be the physical server, the gateway- and webserver will be virtual servers. The whole setup will be build in steps, first we build the homeserver and connect it directly to the Internet. Later, when we have our first virtual server running (the gateway) we will insert this between our homeserver and the Internet. The last step is to add the webserver.
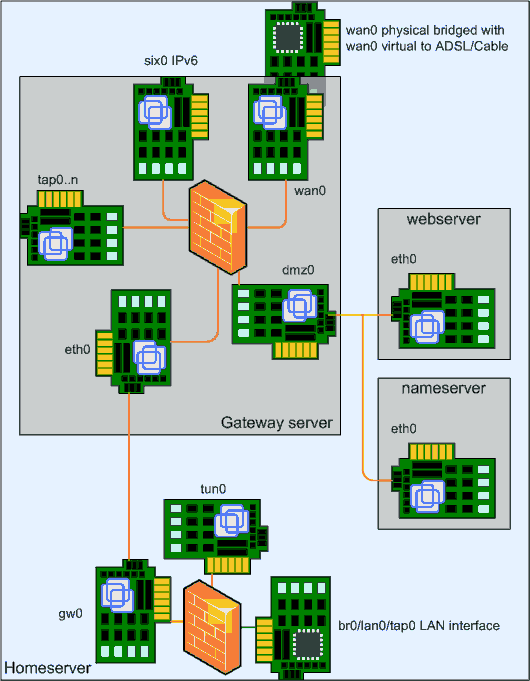
The end result will look like the drawing above. It might look complicated, but it’s really the same as the first drawing using three different computers. There are only two physical network cards, the one on the top is the Internet connection, the one at the bottom is where all home computers will be connected.
But why are the server and gateway split over two computers, while Linux can do both perfectly in one. The reason is actually simple, if you do it in one computer, your firewall rules will become very complex. And complex firewalls can have design errors. So we split the two. Another advantage is that on the gateway/firewall virtual computer there is no need to run any services, only ssh to help us install the firewall. And because that’s the only service, the firewall is simple.
There is also a bit of extra fun in the separate gateway, it’s a perfect system to hook up other home networks from your family and friends using secure OpenVPN networks via the Internet. Therefore is the tap0 on the left.
The virtual gateway server needs very few resources, a virtual webserver needs a bit more if the webserver application is something like WordPress, Drupal, Joomla or other CMS like system. The virtual servers will be installed as Linux Containers.
The physical server should run headless, no monitor and keyboard will be connected. Not every PC is happy without a keyboard, but most modern PCs can do without and there may be a BIOS setting to prevent that the BIOS complains about a missing keyboard. If you are in the BIOS checking this, you may also look for a setting what the PC will do after a power loss. Some PCs stay off after the power is restored, and some can be set to power on or take the last setting, which in our case of course is to power on.
Choosing the hardware.
There are several possibilities to use for a home server varying from an old Pentium PC, Pogoplug, a new PC, or a real server and anything in between. The hardware I used was bought in 2008 as bare bone system and was completed with the following components:
- Bare bone system – ASUS V3-M2A690G
- Memory – 2 x Kingston 1 Gb PC2-6400/800
- CPU – AMD Athlon X2 4850e
- Hard disks – 2 x WD SATA-II 640 Gb 16 Mb cache
- DVD/CD reader – Samsung 16/48X
- Extra network card – RealTek RTL8139
I choose this CPU because it had the lowest power consumption and reasonable performance. Because the fans are regulated, this system is very quiet. For performance it is important is that you pick a CPU that supports hardware virtualization like AMD-V or Intel-x. The DVD/CD drive is only needed during installation, if you have a USB stick with the initial installation software you can leave out the DVD/CD drive. I just installed the cheapest one I could get.
The software.
There is a choice between 32 and 64 bits versions for the operating system. Slackware 32 bit (at least 14.0 I think) is compiled with PAE/NX enabled, so it has no 4 GB memory limit.So, there is no advantage in using a 64 bit version for our server project. But, if you decide to do it, you must also install the 32 bit compatibility packages when you decide to install VirtualBox host services. In my opinion, 64 bit Linux is good for the desktop if you use a lot of graphic and video applications, but a server doesn’t run large programs that benefit from 64 bit addressing.
At first I used Slackware as the operating system, but later I switched to Arch Linux. Today I’m back with Slackware again because Arch is going into the wrong direction for servers.
There are a few packages that are not available for Slackware, but we will make these packages ourself and install them in a repository on our own home server.