Index.
- Introduction.
- Install and configure Samba.
- Trash maintenance.
- Windows XP client.
- Windows 7 client.
- Download.
18-Jun-2011: initial version.
25-Nov-2012: rewrote for Slackware.
Introduction.
To share file systems to Windows clients Samba is used. We will make global user shares, private (home) shares and printers available for Windows computers.
In earlier Home Servers that I configured Samba was setup to act as a domain controller, but since a few years most Windows computers delivered on consumer PC’s are stripped (they call it Home edition) and cannot login to a domain. You could install a more expensive version of Windows to be able to login a domain but for home use it’s overkill. The simpler user security model gives home users enough security and flexibility. Important is that when you install a new Windows PC, you should choose (but not must) a user name that is compatible with standard Unix login names. For example, my name Michiel Broek, will have a user name mbroek in lowercase characters. If you use the same name on the client and server, you can configure the client to startup and bypass the login screen, and it still automatic attaches all shares as network drives. For home use this is secure enough and still all home users are separated on the server.
Install and configure Samba.
Install the default Samba from the Slackware distribution. Then create /etc/samba/smb.conf:
# Samba config file
#
# Order of the sections is important.
# testparm gets confused but I don't know why

[global]
        display charset = UTF-8
        workgroup = WPL_YM
        netbios name = HOMSRV
        server string = Samba %v Server (%h)
        interfaces = 10.126.160.253/24
        log level = 0
        #log level = 3 passdb:5 auth:10 winbind:2
        # all tdb printdrivers lanman smb rpc_parse rpc_srv rpc_cli
        # passdb sam auth winbind vfs idmap quota acls locking msdfs
        # dmapi registry
        syslog = 0
        syslog only = No
        max log size = 0
        time server = Yes
        deadtime = 15
        os level = 65
        preferred master = Yes
        domain master = Yes
        wins support = Yes
        ldap ssl = no
        printing = cups
        print command =
        lpq command = %p
        lprm command =
        # Default yes, but then empty workgroups stay visible forever.
        enhanced browsing = no

[homes]
        comment = Home Directories
        valid users = %S
        read only = No
        hide files = /Maildir/
        browseable = No
        vfs objects = recycle
        recycle:repository = /home/samba/trash/%U
        recycle:exclude = *.tmp *.temp *.o
        recycle:maxsize = 20971520
        recycle:versions = Yes
        recycle:keeptree = Yes
        recycle:touch = true

[printers]
        comment = All Printers
        path = /home/samba/printers
        printable = Yes
        use client driver = Yes
        browseable = No

[trash]
        path = /home/samba/trash/%U
        comment = Network Recycle Bin
        writeable = No
        browsable = Yes
        preexec = mkdir -p /home/samba/trash/%U

[IPC$]
        path = /tmp

[media]
        comment = Multimedia
        path = /mnt/media
        force group = users
        hide files = lost+found
        read only = No
        create mask = 0664
        directory mask = 0775
        vfs objects = recycle
        recycle:repository = /home/samba/trash/%U
        recycle:exclude = *.tmp *.temp *.o
        recycle:maxsize = 20971520
        recycle:versions = Yes
        recycle:keeptree = Yes
        recycle:touch = true

[users]
        comment = User Directories
        path = /mnt/users
        force group = users
        hide files = lost+found
        read only = No
        create mask = 0664
        directory mask = 0775
        vfs objects = recycle
        recycle:repository = /home/samba/trash/%U
        recycle:exclude = *.tmp *.temp *.o
        recycle:maxsize = 20971520
        recycle:versions = Yes
        recycle:keeptree = Yes
        recycle:touch = true
A few remarks about the configuration:
- Samba is the WINS server for the network.
- It only listens on interfaces eth0 and lo.
- The shares have networked recycle bins.
- CUPS printers are automatic available.
- Trash is the recycle bin share.
- The IPC$ share is for very old clients.
- The media and users shares are available for all users.
The recylce bins are a nice feature in Samba, all the files and directories that users delete on the Home Server go to the Trash share. Once there, users cannot delete trashed items, only copy them back. The directory structures are preserved in the trash. A daily cron job removes items from the Trash after a few days.
Make sure the mount points /mnt/users and /mnt/media are owned by the group users and have mode 0775. Then create the printer spool directory and users trash base as follows:
[root@homsrv ~]# cd /home
[root@homsrv home]# mkdir samba
[root@homsrv home]# cd samba
[root@homsrv samba]# mkdir trash printers
[root@homsrv samba]# chmod 777 trash printers
[root@homsrv samba]# chmod +t trash printers
[root@homsrv samba]# ls -la
total 12
drwxr-xr-x 3 root root 4096 Jun 18 14:49 .
drwxr-xr-x 5 root root 4096 Jun 18 14:49 ..
drwxrwxrwt 2 root root 4096 Jun 18 16:33 printers
drwxrwxrwt 2 root root 4096 Jun 18 14:49 trash
[root@homsrv samba]#
Now start samba with “/etc/rc.d/rc.samba start“. Add the normal users to samba with “smbpaswd -a <unixname>”. The users must have the same name as the unix name, and have the same password too. Keeping the password the same on the client computer, home server Linux account and Samba account is a good idea. In theory the user doesn’t need access to Linux itself, but it is simpler if you later add mail boxes.
Trash maintenance.
Next is a part of the script /etc/cron.daily/samba.trashclean that I found on the Internet:
#!/usr/bin/perl -w
# v1.0
# Copyright (c) Duncan McNutt May 2008. Free for personal use.
# Please send enhancements & bug reports back to me duncan _at_ aranea net
# For commercial use, please contact me.

# List of the shares with recycle bins goes here, use colons ":" to separate
# the different directories.
#$recycledirs = "/home/exampledir:/home/you-didnt-configure-this-yet";
$recycledirs = "/home/samba";

# After how many day in the recycle bin should the files be removed?
# Most people seem to think a week is fine.
$maxage = 7;

# ATTENTION: you must set either the touch or the touch_mtime for each recycle
# entry in smb.conf for this script to work!!!
#
# As most of the tips in the internet use touch, atime is the default.
$modifiedtime = "atime";

# Following is the name of the recycle bin, the default is ".recycle"
# This can be changed with the "recycle:repository = " option in smb.conf
#$recyclename = ".recycle";
$recyclename = "trash";

# Extra messages for each action is printed when "verbose" is on.
# 0 means be quite; 1 means print informative output, 2 means print everything
$verbose = 0;
Adjust what you need. The complete script is in the download archive. When you install the script in the /etc/cron.daily directory it will run each day.
Windows XP client.
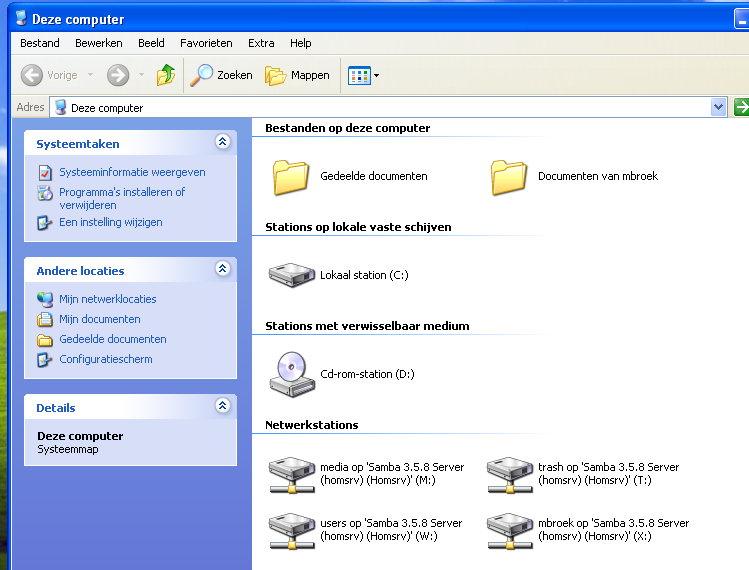
When you install XP you should use a extra user on the system that has the same name as on the Home Server and in Samba. If you like you can give that user administrator privileges so that you don’t need the original administrator account anymore. In the configuration screen, select System and then the Computer name tab. Set the workgroup name to the same name as used in the Samba setup and reboot XP. After the next startup you should be able to browse the network neighborhood and see our Home Server. In the same window, select the extra menu and Make network connection. Map the server shares one by one to a drive letter and set it to reconnect at next logon. Use a logical plan for the mapping, and use high letters in the alphabet because some systems with card readers need a lot of lower drive letters for themselves. The result can then look like:
Network printers can be added from the configuration panel. Because there are no printer drivers on our server, Windows will complain and tell you to use local drivers. For the CUPS pdf printer you can use the Apple color laserwriter that is build in. If you have a printer that has no build in driver, you need to install the drivers that were delivered with your printer. In that case, first install the printer local, then remove the printer. Now you still have the drivers installed. Then select that same printer on the network, and use the drivers that you now have in your drivers list.
Windows 7 client.
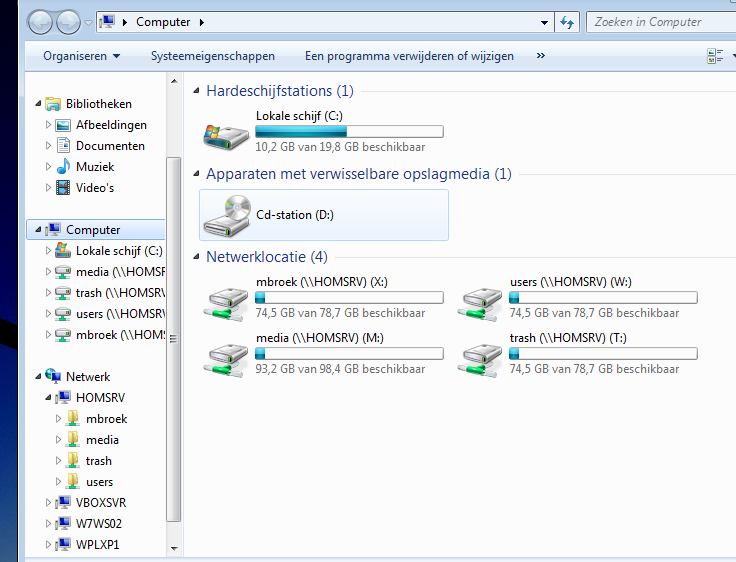
When you install Windows 7 you should choose a user name on the system that has the same name as on the Home Server and in Samba. This user is automatic the administrator of the Windows 7 computer. In the configuration screen, select System and then the Computer name tab. Set the workgroup name to the same name as used in the Samba setup and reboot Windows 7. After the next startup you should be able to browse the network neighborhood and see our Home Server. In the same window, select the extra menu and Make network connection. Map the server shares one by one to a drive letter and set it to reconnect at next logon. Use a logical plan for the mapping, and use high letters in the alphabet because some systems with card readers need a lot of lower drive letters for themselves. The result can then look like:
Adding a printer is about the same as on Windows XP, only if you use the cups pdf printer, then there are no Apple printers. Use some HP postscript model instead.
Download.
See the download page for the script and configuration files.

